

Introduction
Screws look simple, but when they stop working properly, a small fastening issue can quickly turn into a larger repair problem. You may notice screws that keep loosening, screws that spin without tightening, stripped screws that no longer grip, rusty screws that will not come out, or screws that crack the material around them. These problems are common in furniture, doors, cabinets, drywall anchors, machines, metal panels, decking, and wall-mounted fixtures. The good news is that many screw problems can be narrowed down by checking the material, the screw type, the size of the pilot hole, and the condition of the threads before you attempt a fix.
This guide is built for urgent, practical troubleshooting. Instead of giving theory only, it focuses on what to inspect first, how to tell one cause from another, what repair approach usually works, and when continuing to force the screw is likely to make the damage worse. If you are dealing with household hardware, woodworking joints, wall fixtures, or equipment covers, the same logic applies: identify the failure pattern, stop the damage from spreading, and use the right repair method for the base material.
First 3 Things to Do When Screws Cause Trouble
Before you grab a bigger drill or apply more force, do these three checks first. They solve a surprising number of screw-related issues and reduce the chance of stripping the head, enlarging the hole, or cracking the surrounding surface.
Do these first:
- Stop turning the screw as soon as it starts slipping, spinning freely, or grinding the material.
- Identify the base material first: wood, drywall, metal, plastic, masonry, or a wall anchor.
- Check whether the problem is with the screw head, the threads, the hole, or the material around the hole.
These quick checks matter because different screw failures require different fixes. A wood screw spinning in soft wood is not repaired the same way as a machine screw in metal, and neither should be treated like a drywall anchor that has failed behind the wall surface. The fastest path to a durable repair is choosing the right diagnosis early.
Common Reasons Screws Fail
If screws are not holding, not tightening, or not coming out, the cause is usually visible once you know what to look for. Use the table below to classify the issue before trying a repair.
| Cause | How to Identify It | Recommended Action |
|---|---|---|
| Stripped screw head | Driver bit slips; recess looks rounded or chewed up | Use the correct bit size, increase grip, then remove with extraction methods if needed |
| Stripped hole in wood or plastic | Screw turns but never tightens; hole feels oversized | Repair the hole, reinforce the base, or upsize only if the material allows it |
| Wrong screw type | Threads do not bite properly; screw shape does not match the application | Replace with the correct screw for wood, sheet metal, masonry, or machine threading |
| Pilot hole too large or missing | Too large: no grip. Too small: splitting, binding, or broken screw | Match the pilot hole to the screw size and material |
| Corrosion or rust | Orange-brown staining, seized threads, difficult removal | Use rust-safe loosening methods and replace with corrosion-resistant hardware |
| Anchor failure in drywall | Wall area crumbles, anchor spins, mounted item feels loose | Replace the anchor type or move to a stronger mounting point |
| Overtightening | Threads fail suddenly, head snaps, material cracks | Repair the damage and install a new screw with controlled torque |
| Vibration or repeated movement | Screws loosen again after days or weeks | Use locking methods, better fasteners, or reinforce the joint |
Step-by-Step Screws Troubleshooting Process
Work through the following process in order. This prevents guesswork and helps you avoid turning a repairable fastening issue into damaged furniture, a cracked panel, or a failed wall mount.
Step 1: Identify the exact failure pattern
Start by naming the problem accurately. Does the screw refuse to tighten? Does it tighten once and then loosen again? Is the screw head stripped? Is the hole enlarged? Is the screw frozen in place? Is the surrounding material splitting? This first distinction matters because it tells you whether the repair should focus on removal, hole restoration, hardware replacement, or support for the surrounding material. People often say “the screw is bad” when the real problem is the hole, anchor, substrate, or incorrect fastener selection.
Step 2: Match the screw to the material
Check whether the screw is actually suitable for the job. Wood screws, sheet-metal screws, machine screws, deck screws, self-tapping screws, and masonry fasteners are not interchangeable in every situation. If screws are installed in the wrong base material, they may never grip properly no matter how tightly you drive them. For example, a wood screw installed in thin metal may strip quickly, while a machine screw placed into plain wood without a threaded insert will not hold as intended. When the screw type is wrong, repair attempts on the old hole alone may not solve the issue.
Step 3: Inspect the hole, not just the screw
Many screw failures come from the receiving hole. In wood, the fibers may be crushed or torn. In drywall, the anchor cavity may be enlarged. In plastic, the threads may be rounded out by repeated use. In metal, the internal threads may be damaged or cross-threaded. If the hole is already compromised, reusing the same screw in the same opening will often fail again. This is why a screw can look fine in your hand but refuse to hold when reinstalled. The hole condition determines whether you need reinforcement, filling, a new anchor, or a new mounting location.
Step 4: Check for installation errors
Improper installation creates problems that appear later. A missing pilot hole can cause splitting or excessive resistance. A pilot hole that is too wide can remove the bite needed for holding power. Driving screws at an angle can damage the entry path and reduce thread contact. Using the wrong driver bit can round out the head. Applying too much force can strip the threads before the joint is even seated. If screws keep failing in a repeated way, poor installation technique is often part of the pattern.
Step 5: Look for environmental or load-related causes
Sometimes the screw itself is not the root issue. Moisture can swell and shrink wood, slowly reducing holding consistency. Outdoor exposure can corrode screws and lock them in place or weaken them. Vibration from doors, appliances, machines, or repeated movement can back screws out over time. Overloaded shelves or brackets can place force on fasteners that were never designed for that weight. If screws keep loosening after you replace them, ask whether the joint is moving, flexing, vibrating, or carrying too much load.
Step 6: Choose the repair based on the failure type
Once you know the cause, select the least destructive repair that restores holding power. If the screw head is stripped but the hole is fine, the main task is clean removal and replacement. If the hole is stripped, the repair must restore material strength before reinstalling a screw. If the anchor failed, replacing only the screw will not help. If rust caused seizing, focus first on safe loosening and then use more suitable hardware. Avoid the common mistake of simply using a longer or wider screw without checking whether the base material can support it.
Step 7: Test the repair under normal load, not extreme force
After repair, confirm that the screw holds under realistic use conditions. A cabinet hinge should move smoothly without wobble. A wall-mounted fixture should sit stable without shifting. A machine cover should sit flush without rattling. Do not test by yanking or overloading the joint immediately. The goal is to confirm proper grip, alignment, and resistance to normal movement. If the screw loosens again quickly, the underlying cause may still be unresolved.
Step 8: Replace damaged hardware instead of reusing doubtful screws
Reusing damaged screws is one of the most common reasons repairs fail twice. If the threads are worn, the head is rounded, the shaft is bent, or corrosion is visible, replacement is usually the better choice. A fresh, correctly sized screw is far more reliable than trying to “make do” with compromised hardware. This is especially true in load-bearing brackets, door hinges, equipment covers, and exterior applications where failure can create safety or water-entry issues.
When to Call a Professional
Some screw problems are minor, but others point to substrate failure, hidden damage, or structural risk. In those cases, continuing to experiment can make the repair more expensive.
Warning signs that need professional help:
- Screws are failing in a structural connection, stair component, deck, railing, ceiling mount, or heavy wall fixture.
- The surrounding wood, drywall, metal, or masonry is cracked, crumbling, or separating.
- A wall-mounted item feels unsafe, shifts under load, or has pulled partially away from the wall.
- Rust, water damage, or rot is visible around the screw location.
- A broken screw shank is embedded where removal could damage the part or assembly.
- Repeated repairs keep failing and the joint still loosens after proper reinstallation.
- The item being secured carries significant weight, electrical equipment, plumbing components, or moving mechanical parts.
If screws are part of a safety-critical mounting point, do not rely on a temporary fix. A professional inspection is especially important when the fastening point involves hidden framing, anchors in unknown wall material, corroded exterior assemblies, or expensive equipment where further damage could spread beyond the screw location.
If you are troubleshooting screws in doors, cabinets, wall brackets, metal panels, furniture, or outdoor fixtures and the repair still does not hold, the best next step is to arrange a proper inspection or repair service instead of repeatedly tightening the same failed fastener.
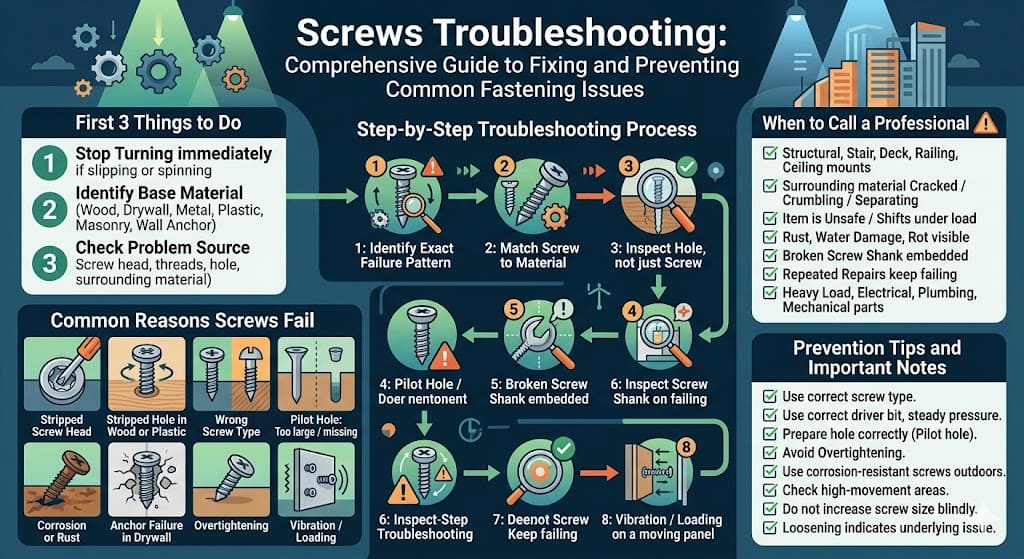
Prevention Tips and Important Notes
Preventing screw problems is usually easier than repairing them after the hole or material is damaged. A few habits make a major difference in long-term holding power and service life.
- Use the correct screw type for the material and application, not just the nearest size on hand.
- Use the correct driver bit and keep steady pressure to avoid stripping the head.
- Prepare the hole correctly when the material requires it, especially in wood, plastic, or metal.
- Avoid overtightening. Stop once the joint is secure and flush.
- For outdoor or damp conditions, use corrosion-resistant screws suited to the environment.
- Check high-movement areas periodically, such as hinges, handles, covers, brackets, and machine panels.
- Do not increase screw size blindly. A larger screw can split weak material or worsen damage.
- If a screw loosens repeatedly, treat that as a sign of an underlying issue rather than a simple tightening problem.
The most important note is this: screws fail for a reason. When you understand whether the failure comes from the screw, the hole, the material, or the load, the repair becomes much more predictable. When you ignore that distinction, even a new screw may fail in the same place within days.
FAQ
1. Why do screws keep loosening after I tighten them?
Screws usually loosen again because the hole is worn, the base material is weak, the screw type is wrong, or the joint is exposed to movement or vibration. Re-tightening alone rarely fixes the root cause.
2. What does it mean when a screw spins but never tightens?
That usually means the threads are no longer gripping. The hole may be stripped, the anchor may have failed, or the screw may be too small or unsuitable for the material.
3. Are stripped screws the same as stripped holes?
No. A stripped screw usually refers to a damaged head or damaged threads on the screw itself. A stripped hole means the receiving material can no longer hold the threads properly.
4. Why do screws break during installation?
Screws can break when too much torque is applied, when the pilot hole is too small, when the screw quality is poor, or when the material creates excessive resistance during installation.
5. Can I just use a bigger screw when screws stop holding?
Sometimes, but not automatically. A larger screw can worsen damage or split the material if the base is already weak. The correct decision depends on the material condition and load requirements.
6. Why do rusty screws become so hard to remove?
Corrosion can bind the threads to the surrounding material and reduce the integrity of the screw head. That makes the screw both harder to turn and easier to strip during removal.
7. Do screws fail more often in drywall than in wood?
They can, especially when the screw relies on a weak or incorrect anchor. Drywall alone is not suitable for every load, so proper anchor choice and mounting location matter a lot.
8. What is the most common mistake people make with screws?
One of the most common mistakes is forcing the screw harder when it is already slipping or misaligned. That often damages the head, the hole, or the surrounding material.
9. How do I know whether the problem is the screw or the material?
Check the screw outside the hole and inspect the substrate. If the screw looks intact but still will not hold, the problem is often the hole, anchor, or surrounding material rather than the screw alone.
10. When should I stop trying to fix screws myself?
Stop when the screw is part of a structural, heavy-load, ceiling-mounted, safety-related, electrical, or water-exposed installation, or when repeated attempts are making the surrounding material worse.